In the first part of the series on creating a blog with Hugo, we’ve ended up with a working, albeit empty blog. Now it’s time to add some content to it.
Content in Hugo
Content of a Hugo blog is just markdown files categorized by directories in your repository. You can create your first blog post by running the following command:
hugo new posts/hello_world.md
You can see a markdown file hello_world.md created in /content/posts directory. There’s not much in it right now, but you can replace the title with something more user-friendly and add some content below the last line of dashes. You can see an example below.
---
title: "Hello world!"
date: 2022-11-05T19:22:52+01:00
draft: true
---

## Hello!

This is your first blog post.
The first part of the blogpost, between the two lines with three dashes, is the blogpost’s metadata. Apart from the properties you can see in the example, it can contain the author’s name, cover image and other values. Below this, you can add your own content. It’s just like your regular markdown, so you can add headings, as we did in the example above, code snippets, etc. Starting your blog now will greet you to your post on the front page, and you can click it to view it’s content.
Content management system
Writing markdown files is a perfectly fine way of adding and editing your blog posts, but there are some issues with it. One of them is, you will have to write markdown files - while some code editors have excellent tooling for that, it’s not easy and fun for everyone. Another potential problem is that in order to modify your content you’re going to need access to a machine with your blog’s repository and Git. It’s also more prone to mistakes - I, for one, have accidentally swapped the month’s and day’s digits in the creation date of my first post. You might want a tool with a date picker, image uploader that won’t forget a slash in your picture’s URL and a tag selector that won’t allow you to make a typo in your blog post’s tag.
You can integrate Hugo with many great content management systems. Some are really feature rich, like Ghost - but that requires either paying for it, or setting up your own server. A simpler but free, at least for basic usage, alternative is Forestry - the issue I have with it is that content editing is done through their website, and there’s no guarantee it’s boing to be available (and free) as long as you need it. There’s also NetlifyCMS, but that couples your blog to Netlify platform and is going to cause issues if you’d like to host it elsewhere.
The CMS I’ve chosen is Tina. It’s made by creators of Forestry, so there’s an experienced team behind this project. It’s frontend is hosted alongside your blog, just like NetlifyCMS, and while it requires Tina Cloud backend services (paid for projects of certain scale) for authentication and communication with GitHub, there’s an ongoing discussion about self-hosted alternative.
Getting started with TinaCMS
The first thing we need to do is installing Tina. You can do that by running the following command:
npx @tinacms/cli@latest init --static
After downloading some assets, it’s going to ask you which package manager you’d like to use(I’ve chosen Yarn), whether to use TypeScript (I selected yes), and where are the public assets stored - for Hugo it’s the static directory, so pay attention not to accept the default value.
Let’s look at the changes this command has made to our repository; there’s a new addition to the .gitignore file, a yarn.lock file used by the package manager, a package.json file with dependencies on tinacms and @tinacms/cli, a new blog post and .tina/config.ts - the file that we’re going to use to configure the CMS.
We can now run Tina with the following command:
yarn tinacms dev -c "hugo server -D -p 3000"
For me, it resulted in an error: ERROR: your schema was not successfully validated. If you encountered this error message, for me the fix was to modify .tina/config.ts, search for isTitle: true, and add required: true in the line below it. Running the command now should result in your blog rendering at localhost:3000. You can also access Tina’s admin panel at localhost:3000/admin.
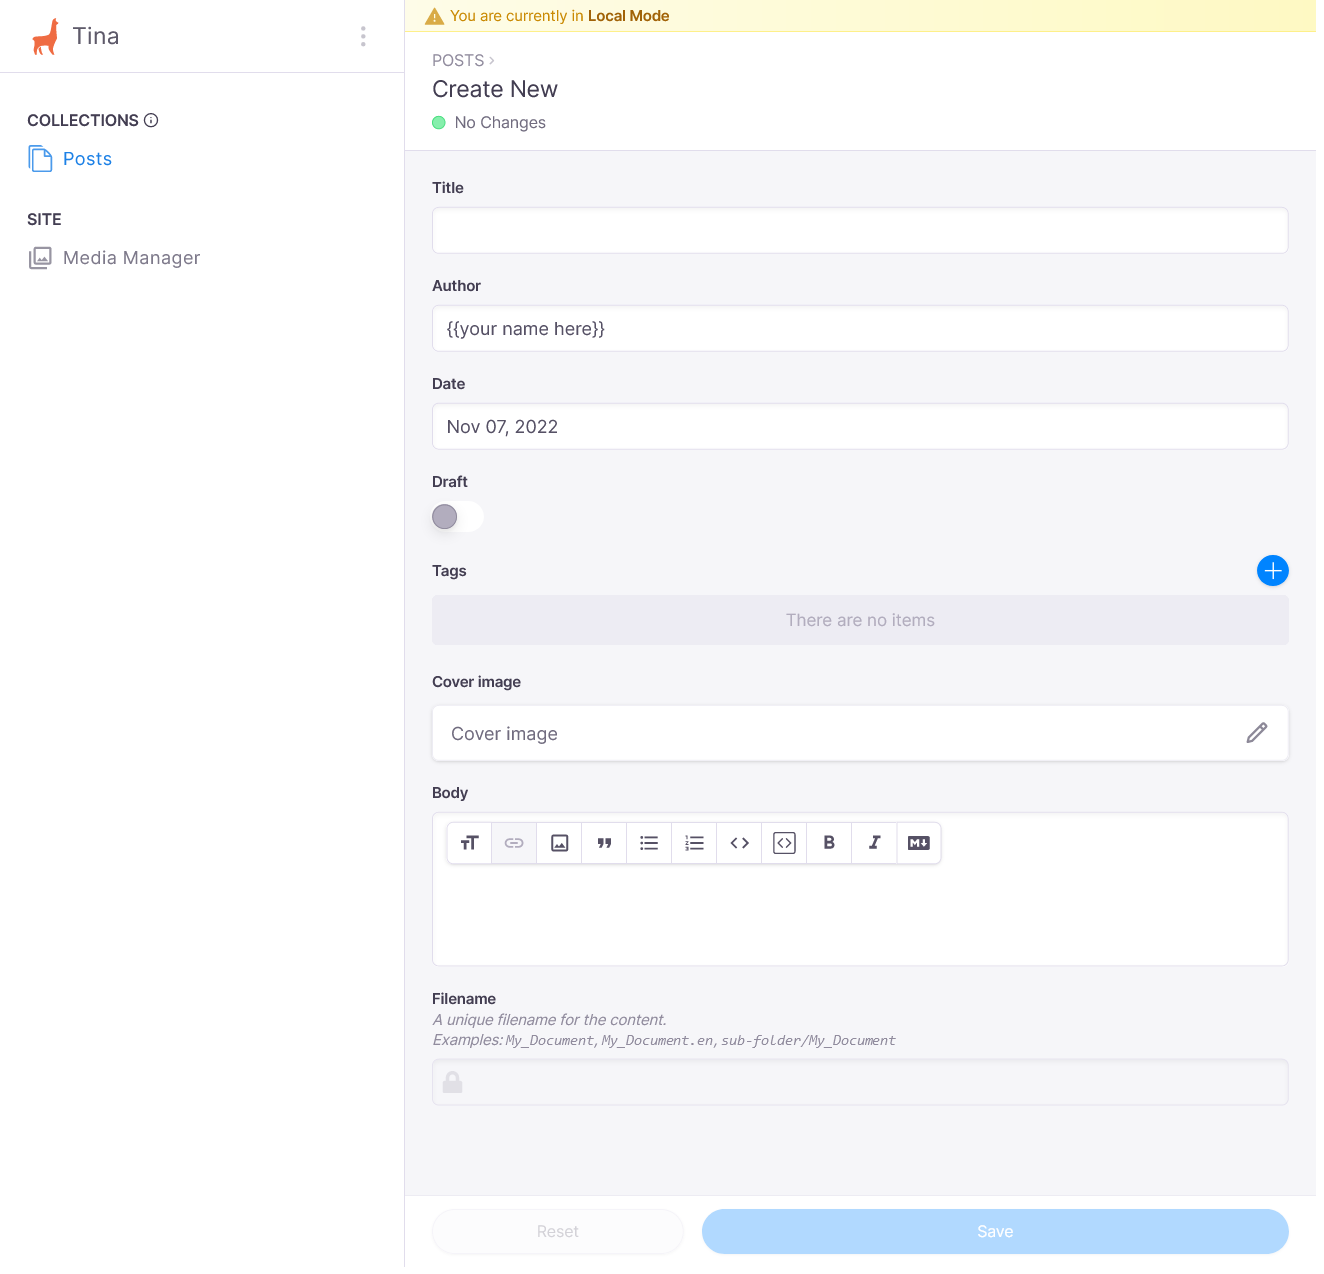
After accessing the admin panel you should be greeted by a preview of your blog meant for contextual editing. It only works with blogs based on React, so let’s use the menu on the left and navigate to your posts collection. Now, after clicking a blog post, you’re able to edit it with Tina.

Custom TinaCMS schema
There’s not much to edit right now. Let’s configure Tina to add some fields to our editor. We can do that by modifying .tina/config.ts. The part that we’re interested in is the schema object, especially the default collection that’s defined there. Let’s look at the default values:
schema: {
  collections: [
    {
      name: "post",
      label: "Posts",
      path: "content/posts",
      fields: [
        {
          type: "string",
          name: "title",
          label: "Title",
          isTitle: true,
          required: true,
        },
        {
          type: "rich-text",
          name: "body",
          label: "Body",
          isBody: true,
        },
      ],
    },
  ],
},
The collections array defines, as the name implies, collections of content. For now, there’s only blog posts here, but in the future you could add a collection of podcasts, videos, recipes, conference talks - any content, that you’d like to show on your blog. Let’s focus on blog post now. Inside the default collection you can see two fields, for title and body of your blog post - we’ve already seen it in the admin panel. Let’s add some fields here, and while we’re at it, let’s define some default values aswell - that’ll make adding blog posts easier. Take a look at our updated schema:
schema: {
  collections: [
    {
      name: "post",
      label: "Posts",
      path: "content/posts",
      defaultItem: () => {
        return {
            author: "{{your name here}}",
            date: new Date().toLocaleDateString("en"),
            draft: false
        }
      },
      ui: {
          filename: {
            readonly: true
          },
      },
      fields: [
        {
          type: "string",
          name: "title",
          label: "Title",
          isTitle: true,
          required: true,
        },
        {
          type: "string",
          name: "author",
          label: "Author",
        },
        {
          type: "datetime",
          name: "date",
          label: "Date",
        },
        {
          type: "boolean",
          name: "draft",
          label: "Draft",
        },
        {
          type: 'string',
          name: 'tags',
          label: 'Tags',
          list: true,
        },
        {
          type: 'object',
          name: 'cover',
          label: 'Cover image',
          fields: [
              {
                  type: 'image',
                  name: 'image',
                  label: 'Image',
              },
              {
                  type: 'string',
                  name: 'alt',
                  label: 'Alternative text',
              },
              {
                  type: 'string',
                  name: 'caption',
                  label: 'Caption',
              },
          ]
        },
        {
          type: "rich-text",
          name: "body",
          label: "Body",
          isBody: true,
        },
      ],
    },
  ],
},
We’ve added fields for an author, date and draft, with default values for those fields, aswell as the possibility to add tags and a cover image. Tina provides a user-friendly UI for some of those fields, like image uploader and date picker. We also set the file name field as readonly - Tina is going to create a slug based on a title for us, so there’s no need to edit it. Before we try out all those features and add a new blog post, let’s create an uploads directory within our static directory - that’s where Tina is going to save our images.
That’s it! You can try it out and start adding your own posts. If you’d like to see the code, you can find it here.